Monday, February 27, 2012

Hope...

We all know how different one child can be from the next. I have one, my second oldest son, who is the quieter one. THe one who is fine taking the backseat to all of the others. If there are 3 blue things and one red thing and all four of my kids want blue, he is always the one to pipe up and say "I'll take the red one". As a parent that sometimes worry me. Sure it makes my life a lot easier in many situations, but I don't want myself or anyone else taking advantage of that. This layout is for him... from me.


This was a layout that I did for Clear Scraps. Which may lead some of you to wonder "where's the acrylic?." Well, the word Hope was created using a Clear Scraps acrylic word. I just kept the protective plastic on it and then used it as a mask for some misting. Then I just outlined the word with some paper piercing.


The rest of the supplies came from a Studio Calico kit.

Thanks for stopping by for a peek today!

Wednesday, February 22, 2012

Late to the party...

So, decided at the last minute to jump on the Project Life bandwagon. I started a wee bit late and am now trying to play catch up. For those of you who aren't familiar with PL, it is a way to document your life throughout the year. I am doing mine as a week by week. If you are interested in reading about PL and what all it entails you can click above on the link.

I opted to just buy the page protectors and then to use my own stash for all of the rest of it, I just couldn't see buying the premade product when I have so much stuff of my own already and it just isn't that difficult to cut 3x4" and 5x7" pieces of paper.

As I said I'm a little bit behind...today I'm sharing with you the opening page and then week 1 and week 2. This album will be just for me, there are no requirements. There are some things in my possession that have long been neglected due to some other commitments. Since this isn't fulfilling any assignments or commitments I'm just going to be using whatever strikes my fancy! FUN! It's been a while since I've done that.

Opening page:


a close up of the hand stitching...


Week 1
Lazy Sunday mornings, ski lessons, and a miserably sick kiddo.
(Lily Bee Head Over Heels Paper)


Week 2
New Barbie pool and making a first basket ever in a basketball game.


That's it for me today....ciao!!!
Tonya


Monday, February 20, 2012

A little celebration

So, a little over a week ago my BABY turned 6. I'm still trying to figure out just where the time has gone.We had our usual family party and boy was she so excited leading up to it! Such fun seeing the pure delight and anticipation on her sweet little face.

I have a lot of fun making her birthday cards as she's the only one who somewhat appreciates them, the boys...well, they could care less! :)

Here is the card that I made for her...she's a pink loving girly girl.


Papers are from My Mind's Eye, banner pieces were made from Spellbinders Nested Pennants, stamps are from Gina K and Papertrey Ink, Jewels are from Want 2 Scrap.

This is probably my favorite photo from the evening....so sweet.


She wouldn't give me a good shot looking at the camera, but I adore the way she is looking at that cake! The pink '6' is special as it was on my mom's cake when she turned 6 and also on my cake when I turned 6...and no, to save embarrassment for two of us I won't tell you just how old that pink '6' really is.

Thanks for stopping by!
Tonya


Thursday, February 9, 2012

Using it up...

I know many of you are wearing the same shoes that I am...you know the ones that make you want all of great new releases from CHA-W? the stuff you absolutely DO NOT NEED? but, you just HAVE to have it?

So that means that I have to use some of the stuff that I already have so that I can buy more stuff that absolutely do not  NEED. Enter My Mind's Eye...my all time favorite paper and embellishment manufacturer. I wish just once CHA they would produce a line or two or three that I didn't like...just once. But, alas, this release is no different for me. I LOVE every single thing. So, I'm using up some of my "older" stuff to make room for the newer stuff.

Today I have the first of many cards that I've made...


This one features My Mind's Eye Stella & Rose papers, sticker, and brad. Spellbinders brand new Aster Flower Topper S5-102, and Classic Ric Rac E8-004. Threw on some old (very old) prima crystal swirls for some bling. 

Thanks for stopping by. My littlest is turning six today so I'm off to "get the party started"!

Tuesday, February 7, 2012

SWAK

With a title like this it must mean that Valentine's Day is right around the corner.  This card features lots of fun little things. Some die cutting, some misting, some vellum, some stamping, some sewing and some bling.


Papers are from the Pink Paislee Sweetness line, jewels are from Want 2 SCrap, and I used the following Spellbinders die templates...Classic Heart, Classic Scallop Heart, and Big Scallop Circles LG.

Well, it's off to the gym for me this morning after I drop the kiddos off at school! Woohoo! I've been cleared by my physical therapist for the recumbent bike, not exactly my first choice but better than the nothing I've been able to do for the last 6 months. Can't believe how excited I am! :)

Enjoy today!

Wednesday, February 1, 2012

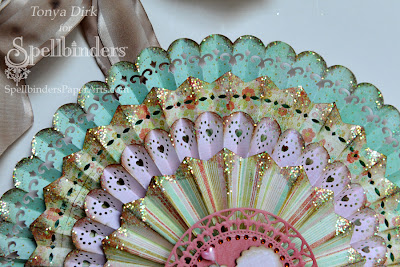
Medallion Wreath

As promised in last weeks post for the Spellbinders blog post I am back to share with you all how to make the medallion wreath that was my second project in the Blog Frenzy. Here's the picture of it to remind you what it looked like...


Instructions:
1. Choose which five papers you want to use and determine which layer you want each to be.  (I will be referring to mine as 1-5, 1 being the largest seafoam green layer and 5 being the middle coral centerpiece). 

Layer 1: Cut four 3x12" strips
Layer 2: Cut three 4x12" strips
Layer 3: Cut three 3x12" strips
Layer 4: Cut two 4x12" strips

2. Choose which Edgeabilities dies and decorative inserts you want to use on each layer. I used a combination from E8-009 Classic Decorative Inserts One and E8-007 Classic Edges One for each layer.


3. For each layer cut all strips with the Edgeability and Decorative Insert of choice. In order to  cut the full length of your strips just simply line up your dies with where you last cut stopped (see above) and run through your machine again. You'll notice on below that on layer 4  I only used the Edgeability die template.


4. Score all strips at 1/2 intervals and then accordian fold. Once you're done scoring then adhere the strips, that are the same, together to make one long strip.


5. Once you have four long strips then adhere the ends together and then they should look like this.


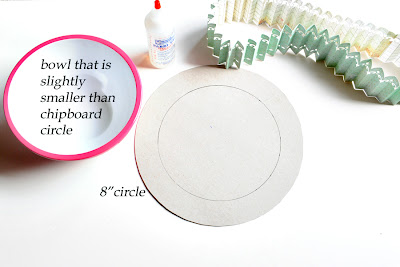
6. Cut descending circles out of chipboard, one for each layer, make sure that the diameter of each circle is smaller than the diameter of your paper layer so that the outer edges cannot be seen under the decorative edges of each layer. Below is an example for layer one. I used a bowl to draw a circle on my chipboard just to use as a guide for gluing my paper layer to.


7. Apply a liberal amount of glue to the out edge of your chipboard circle. Place the bowl in the middle upside down and then push down the paper layer around the bowl. You don't need to use the bowl, but I found that it made it easier to get that paper layer into a nice circle.


8. Do all four layers in the same manner.


9. Then glue them all together so that you have something that looks like this...


10. Cut your decorative center piece out I used Spellbinders Splendid Circles for mine and then embellish the center. 


11. Ink all of your edges, apply glue and glitter. Adhere ribbon and you are done!

The papers that I used for this project are from Fancy Pants' Road Show line, letter alphas are from Studio G, heart stamp is Gina K.

****I really want to make sure that I give credit to the right person for this wall medallion idea. So, thank you to Jennifer Mcguire.

Thanks for stopping by!

Tonya