Tuesday, December 22, 2015

My Favorite Things Color Challenge

Hey all! Putting some more of my new MFT stamps to use, this time for their latest color challenge!

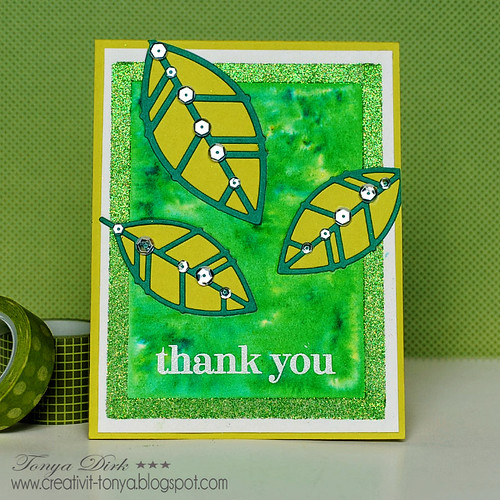
I pulled out the Sweet Safari stamp set and started by first making a bunch of masks for the animals and leaves. I started by stamping the monkey and then masked him off, next I stamped the lion and then masked him off,  then stamped the elephant and masked him off. Lastly, I stamped the leaves and the sentiment.


        mftcolora

Then colored it all in with some Copics and blended some Distress Ink in for the ground and the sky.


       mftcolorb
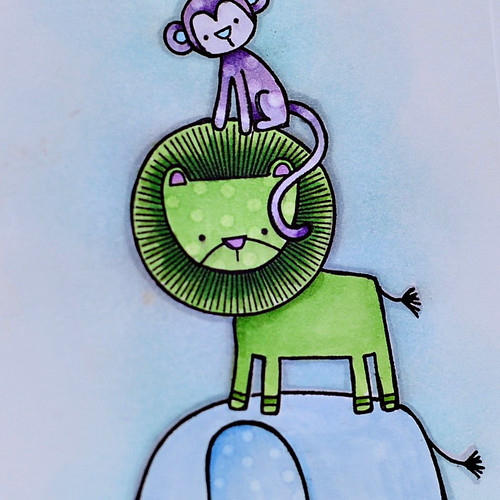
Used the colorless Copic blender to add little polka dots to all of the animals. Cute huh?!

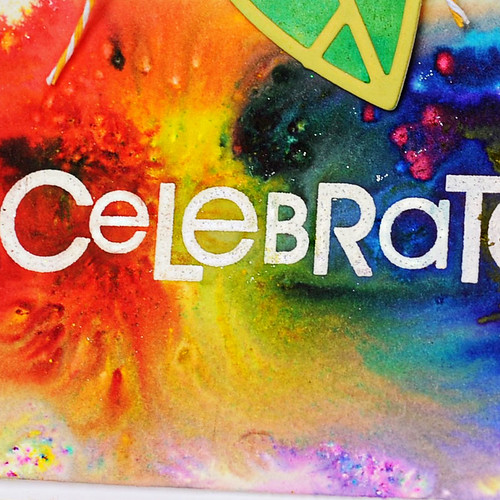
Here's the color palette that was used for this challenge...


Thanks for stopping by to take a peek.

Tonya


Monday, December 21, 2015

My Favorite Things Sketch Challenge #259

After "oohing" and "ahhing" numerous times over all of the the projects that I have seen using My Favorite Things products I finally broke down and ordered some stamps and dies from them. This meant that I could also finally participate in some of their challenges.

I hopped right on the challenge train and made a card for their current sketch challenge. I followed it pretty closely, changing it only slightly...


       mftsketcha

I started by stamping and embossing the lined flower from the Tropical Flowers stamp set. Then I colored it in using some Zig Clean Color markers and a water brush.


       mftsketchb

I really wanted the leaves to have a black outline too so after I stamped them I simply outlined them with a black pen. The sentiment is from the Sweet Safari stamp set.

Here is the sketch that this card was based on...


Thanks for stopping by and taking a peek!

Tonya


Tuesday, December 15, 2015

Sparkle & Shine Challenge Time

Whoop whoop! It's the 15th which means that it is time for another challenge over on the Sparkle & Shine Challenge Blog. This time we have an inspiration photo that is full of fun and bright colors. Lots of things in this one to inspire you.

Here is the card that I created...

                     s&sdec15

I started by stamping my trees along the bottom curved edge of my front panel. Then I masked the trees off and heat embossed the gingham inside of another masked circle. With all of my masking pieces in place I then blended some Tumbles Glass Distress Ink over the top of the gingham. Finished that part off with some tiny red dots around the outer edges. The 'O Christmas Tree' sentiment was also heat embossed and tiny little paper "pokings" that followed the curve. Topped the main tree off with some blue and green Pretty Pink Posh sequins.

                      s&sdec152

We'd love to have you join us at Sparkle & Shine for the challenge. One random lucky participant will win a $25 gift certificate from our sponsor...the very generous Winnie & Walter.


Click HERE to join the challenge.

Stamps:
Treetops Glisten, Background Basics: Gingham, All Through the House (Papertrey Ink)

Tuesday, December 1, 2015

Sparkle & Shine December 1st challenge

Hi all...welcome to the next installment of the Sparkle & Shine challenge. Today's inspiration photo is   one that is very soft and soothing to the senses. It has a touch of purple and a smattering of snowflakes.


Here is my take on the above photo, you can tell the purple and the snowflakes were my inspiration.

s&s120115a

I started with a winter white card base and added some wide strips of glitter using some ScorTape. Then I die cut and stamped the snowflakes, what you can't see very well in the photo is that all of the snowflakes are covered in a fine clear glitter, giving them that frosty look in real life. You can see it a bit in the photo below.

s&s1201152

After I had the snowflakes adhered to the card I simply scattered a few Pretty Pink Posh sequins to finish the look.

We hope you will join us over on the Sparkle & Shine challenge blog. One participant will be randomly selected to win a $25 gift certificate to Pretty Pink Posh!


Click HERE to go to the S&S blog and see what the rest of the team made and to join in on the fun.

Stamps Used:
Fab Flakes and Christmas Cheer (Papertrey Ink)

Wednesday, November 25, 2015

Papertrey Ink Blog Hop

Happy day before Thanksgiving everyone! Today is the day of the monthly Papertrey Ink blog hop. I am super excited this month as I was able to find the time to get a card done for it.


I had so many ideas based on the inspiration photo. Loved the colors and the fact that there was some sparkle. I started this by heat embossing the ornaments and snowflakes onto a panel of watercolor paper. Then I pulled out my Brusho watercolor pigment powders for the background. I am still SO in love with these powders, their colors are so vibrant and they are so fun to work with.

                    pti1115bloghop1

After the panel dried I then stamped the sentiment , drew the strings and bows and added the sequins to the ornaments. I then decided that I wanted the sentiment to stand out a bit more so I pulled out my white gel pen and outline just the 'JOY'.

                    pti1115bloghop2

Here's the photo that was the inspiration for this month's blog hop...


Thanks everyone for stopping by to take a peek.

Supplies:

Stamps: 2011 Holiday Tags
              Tree Trimming Trio
              Snowflake Serenade
                           Vintage Ornament Additions
     Two Feet Deep
                   Instant Photo: Holidays

Watercolors: Brusho Pigment Powders (Turquoise, Leaf Green)

Tonya

Sunday, November 15, 2015

Sparkle & Shine Challnege

Happy Sunday everyone! It's the 15th of the month which means that it is time for another Sparkle & Shine challenge. The photo inspiration for this one is very "November-y" and just plain perfect for this time of the year!


For my card I chose first to put to use the chevron from the pillow, the fall leaves in the wreath and the texture of the background wall.

                    s&shello1

I was super excited with how those leaves turned out, they look really cool in person. For my background I used an embossing folder. For the chevrons I used a terra cotta die cut and then covered it with black and white die cut chevrons, making sure to leave some space in between for my Pretty Pink Posh sequins.
Lastly, I added a bit of shimmer to the die cut 'hello' with a Wink of Stella pen.


                     s&shello2

We'd love to have you join us and participate in the challenge. Click HERE to head over and see what the other design team members were inspired to make and to add your own project to the link. If you play along you could be the winner of a $25 gift certificate to Winnie & Walter!


Thanks for taking a peek, enjoy the rest of your day!

Sunday, November 1, 2015

Sparkle & Shine November 1st Challenge

Happy November!It's the first which means that it is time for another Sparkle & Shine Challenge. This week's inspiration photo is all about the greens, blues, and purples...colors that are right up my alley!

                 s&sNov1a

I started this with a panel of watercolor paper, some heat embossing and some Inspired Blueprint Distress Ink.  I heat embossed the stamps with white first and then applied a watercolor wash on one side of the flowers. Before I let the color wash dry I sprinkled it with some salt, which gave it the marbled look. A little extra bonus to the salt application was that where the blooms occurred a little hint of purple came shining through.

After the wash was dry I then painted in the flowers and leaves with Mermaid Lagoon, Wilted Violet, and Cracked Pistachio. The sentiment was then stamped in black and outlined with a white gel pen.
Lastly, I embellished the flowers with some Clear Pretty Pink Posh sequins.

                 s&sNov1b

Here was this week's inspiration photo...


We'd love to see what you create using this photo. Just head over to the Sparkle & Shine blog (click HERE).  This challenge is being sponsored by Pretty Pink Posh. Join in on the fun and you could win  the following...


Thursday, October 15, 2015

New Sparkle & Shine challenge

Hey everyone, it's the 15th which means that it is time for the new challenge over on the Sparkle & Shine challenge blog. This one is all about fall, halloween, sparkle and pumpkins. I chose to use an older Papertrey Ink stamp set that hasn't seen some love from me in a while Friendship Jar and Friendship Jar Fall Fillers.

                       s&shalloween1

What's difficult to see in the above photo is that all of the pumpkins have some shimmer on them where I used a Wink of Stella pen on them, hopefully you can see it better in the photo below.

                       s&shalloween2

Here is this challenge's photo inspiration...


We'd love for you all to come and join us. Click HERE to join and add your project to the link.
The winner will receive a $25 gift certificate to Winnie & Walter.


Thursday, October 1, 2015

Sparkle & Shine Challenge Fifteen

Happy 1st of October!!! This means that it is time for another challenge on the Sparkle & Shine challenge blog. For this challenge the sponsor is Pretty Pink Posh. All you need to do is make a card using the inspiration photo and enter it in the provided link at the bottom of this post HERE and you will be eligible to win the $25 gift certificate for Pretty Pink Posh (lots of great sequins and dies!).

Here is the card that I made, it's a little bright and vibrant!!!


                  s&scelebrate

This card came about because I had received some new Color Burst pigment powders and was messing around with them. I loved the way they all blended together! The leaves are actually the remnants from the card that I made for the last challenge at Sparkle & Shine!


                  s&scelebrate2 

I heat embossed the sentiment with white embossing powder first and then applied the pigments over the top. My favorite part is the little speckles down at the bottom.

Here is the inspiration photo that is being used for this challenge...fun one right?!


Head on over to the Sparkle & Shine blog and join in on the fun! Don't forget, there is this up for grabs...


Tuesday, September 15, 2015

Sparkle & Shine Challenge Time

Hey everyone, it's the 15th which means time for another challenge at the Sparkle & Shine Challenge blog. The photo inspiration for this one is all about green...


For this challenge we are sponsored by the amazing Winnie & Walter! Their shop contains amazing stamp sets, matching dies and digital images! The winner of our challenge with received a $25 gift card to their online store!


Here is the card that I was inspired to make...

s&sgreen1

I started with a panel of watercolor paper and outlined the edge with some Scor Tape. Prior to peeling off the release paper and adding the glitter, I used Brusho water color powders to create the marbled green background. After it was all dried and the glitter applied I ran the panel through my die cutting machine multiple times with a leaf die to create a negative space. I then cut the leaves out of two different colors of cardstock and inlaid the pieces into the card front. Heat embossed the sentiment and embellished with some sequins from Pretty Pink Posh.

s&sgreen2

We would love for you to come and join us in the challenge. Click HERE to be taken to the Sparkle & Shine blog where you can upload your project with the provided link.

Thanks for stopping by to take a peek.

Tonya

Tuesday, September 1, 2015

Sparkle & Shine Challenge

Welcome to the first of the month. This means that it is time for the new challenge over on the Sparkle & Shine challenge blog. This one is being sponsored by Pretty Pink Posh! Come play along and you could win a $25 gift certificate to Pretty Pink Posh!


This challenges prompt is the following photo...using tags!


And here is my take on the challenge...

s&shellotags1


I used an "old" sheet of Dear Lizzy Paper that is covered with strips of crepe paper as the base of my tags. Then I took a piece of watercolor paper and added a watercolor wash in two different color schemes to it. After it was dry I then die cut the Hello tags out of the paper. Adhered these to my tags and then embellished them each a little differently with some of my favorite colored sequins from Pretty Pink Posh.

s&shellotags2

Supplies:
Dies: Hello Circle- Fresh Cut August 2015 (Technique Tuesday)
Sequins: Pretty Pink Posh

Make sure to join us for the challenge...just click HERE to link up your project!

Tonya

Monday, August 31, 2015

Stamp-a-faire

Just quickly sharing two cards that I was able to complete for Papertrey Ink's Stamp-a-faire. Life is always too busy to be able to create as much for this as I want, and a flooded basement wasn't in my plans.

I made cards for the first two challenges. This first one is a wedding card, all white with a little bit of gold accent.
 
ptiwedding

I started by running the front panel of my card through my die cutter with an impression plate. Then I simply layered on Delicate Details and Stacked Sentiments die cuts. Heat embossed my sentiment in gold and added a few clear sequins for a fancy touch. :)

This next card was made for the Patterns challenge. 

ptipatterns

For this one I started with a panel of watercolor paper that I put a wash on using Distress Inks.
I then die cut the happy from two different colored rectangles of cardstock and used one half of each rectangle. The flowers were die cut from some the watercolored panel and then stamped.

Supplies:

Wedding Card
Dies: Delicate Details, Stacked Sentiments (PTI)
Impression Plate: Polka Dot Basics II (PTI)
Stamps: Stacked Sentiments (PTI)

Happy Card
Dies: Fall Florals, One Liners Happy Dies (PTI)
Stamps: Scribbled Sentiments, Fall Florals (PTI)

Wednesday, August 26, 2015

CAS(E) this Sketch #137 and AAA Card Challenge

Hey all! I have a fun little card to share with you today. This one is based off of the latest sketch over at CAS(E) this Sketch and also inspired by AAA cards challenge #46 (Masquerade). I had a lot of fun pulling this one together and used a lot of my favorite techniques.

                    ptitiltedbday1

I started the panel by using a Heidi Swapp mask and some Cracked Pistachio Distress Ink. Then I die cut the flowers from some watercolor paper and painted them in with more Distress Inks (Picked Raspberry, Abandoned Coral, and Mustard Seed). After they were done drying I adhered them to the corner of the panel. I stood back and looked at and things were just kind of blah...enter me and my black liner pen. First I added the marks to the petals, then to the flower centers. Lastly I went a bit cray cray and outlined all of the masking.

                    ptitiltedbday2

As you can see my inner crazy couldn't just stop with all of the line work...I had to go and add tiny jewels to all of the centers!

Here is the CAS(E) sketch and AAA prompt that inspired this cars...


Supplies:
Stamps: Bloomers, Stacked Sentiments (Papertrey Ink)
Dies: Bloomers (Papertrey Ink)
Inks: Picked Raspberry, Abandoned Coral, Mustard Seed, Cracked Pistachio (Ranger Distress Inks)
Mask: Heidi Swapp

Thanks for stopping by!

Tonya


Runway Inspired

Hello all. I'm sitting here relishing in the quietness of this last morning of summer for my kids. They're all still asleep today, tomorrow at this time things will be hopping. For the first time ever I am not ready for school to start. With four kids I am usually counting down the days and this year it has snuck up on me. I'm not a fan of this starting school before Labor Day schedule...really wanting the old schedule back.

Today I have a card to share with you that was made for the latest challenge over on the Runway Inspired site. I've been purging some older scrapbook kits that I have had laying around and am trying to use some of the items that I find I am still drawn to. For the base of this card I cut down a sheet of ruffled crepe paper from the Dear Lizzy line. The ruffles were too far apart for me to get all three colors on the card base so I cut them into separate strips and placed them closer together, fortunately the ruffles hide all of this.


               altfriend1

The flower stamps are from Altenew's new Golden Garden set. I started by stamping them all on watercolor paper. Then painted them in using Zig Clean Color markers. Lastly I fussy cut them all out and adhered them onto the card front. The missing you sentiment is a stamp from Altenew's Label Love stamp set. Topped it all off with a couple of sparkly jewels.

                altfriend2

This photo was the inspiration for this card...there is still time for you to add your project just click HERE to join.


Thanks for stopping by today.

                                             Tonya