Wednesday, October 12, 2016

My Favorite Things Color Challenge

It's October which means the latest color challenge over on the My Favorite Things blog is all about everything orange, purple, and green. I opted to go with a floral card using this color scheme that would not normally be a go to combo for me.

 IMG_2586

I started this one by die cutting the flowers and leaves out of white cardstock using the Flashy Florals die set. Then I misted all of the pieces with water and sprinkled them with Brusho Watercolor Pigment Powders. After all of the pieces were dry I then stamped on all of the flowers with the detail stamps from the Flashy Florals stamp set.

 IMG_2584

I arranged all of the flowers and leaves in a pretty little cluster above the dry embossing on my card front. Finished it all off with some enamel dots, crystals, and a simple little banner.

Thanks for taking a peek today!

Tonya

Monday, October 10, 2016

My Favorite Things Sketch #301

I found some time this last weekend to join in on the latest sketch challenge over at My Favorite Things...


I pulled out my Zig Clean Color Brush Markers and my Flashy Florals stamp set and went to work.


  IMG_2585

I heat embossed the solid flowers and leaves onto watercolor paper using white embossing powder. Then I took yellow, brown, blue and teal Zig markers and colored (very messily might I add) over the top of the embossing. After I was done scribbling (literally) I sprayed the entire paper with water and just let the colors blend together as it dried.


IMG_2582

Then I die cut a circle out of the panel and turned it into a shaker card. Once that was assembled I added a stamped flower and some gold glitter leaves...topped off with a simple banner sentiment.

Thanks for stopping by to take a peek.

Tonya


Tuesday, September 27, 2016

Happy Birthday

Dusting off the cobwebs in this blog. Had a little bit of spare time on my hands last week and decided to join in on the new challenge over on the wherecreativtymeetsc9 blog. The theme for their first challenge is 'celebrate'.

I pulled out my Happy Day stamp set and chose to work with the main cake image.


  IMG_2535

I began with heat embossing the image using white embossing powder onto a panel of watercolor paper. The color was applied by using the 'smooshing' technique with Distress Inks. After that dried I went in and applied more concentrated color onto the flowers and leaves.


  IMG_2532

To finish off the card I used a Wink of Stella glitter pen and colored over the flowers and leaves to make them sparkle and went in with my paintbrush and some grey paint to add the shadows. Topped it all of with a few sequins.


  IMG_2533

Thanks for stopping by and taking a peek!

Supplies:

Stamps: Concord and 9th- Happy Day
Inks: Distress Inks - Picked Raspberry, Ripe Persimmon, Mustard Seed, Peacock Feathers, Twisted Citron, Wilted Violet


Friday, July 29, 2016

My Favorite Things Weekly Sketch

Time for another weekly sketch challenge with My Favorite Stamps...


I received these adorable little piggies just a couple of days ago and decided to put them to use for this one.

  IMG_2344

I started with a Pierced Square die cut and went around the edges with a light pink Copic, then I stamped and colored the three little pigs. I fussy cut the flying piggy so that  I could pop him up with some foam tape (he needs to be in the air since he is flying, right?) I then die cut a sun using the Radiant Sun die and die cut some clouds. 

IMG_2343

I heat embossed the sentiment onto a piece of vellum which I then layered over a strip of cardstock that is the same color as the sun. The tiny little hearts were die cut using on of the pieces from the Blueprints Tag Builder 5 set.

IMG_2342

Lastly, I took a clear Wink of Stella pen and went over the wing, the sun, and the heart.

Thanks for stopping by to take a peek!

                                                              Tonya

Friday, July 22, 2016

My Favorite Things Color Challenge #49

Whoop! I received my recent order of new stamps from My Favorite Things and decided to participate in their current color challenge.


I pulled out my Brusho pigment powders and the stamps/dies from the Celebrate with Cake set.

IMG_2325

I embellished each layer of the cake with some iridescent glitter and some white liquid pearls.
Then added some flowers with some jewels centers.

IMG_2324

For my sentiment I heat embossed a red banner strip in white and then added some smaller banners on each side in contrasting colors.

Thanks for stopping by to take a peek!

Tonya

Saturday, June 25, 2016

Papertrey Ink Blog Hop


Good morning everyone! After seeing the photo prompt for this month's PTI blog hop I was super excited to join in on the fun. This photo is so artsy and I think it will be super interesting to see what everyone comes up with! This is the photo...a piece of artwork by the artist Yellena James.


I knew right away that I wanted to use my Color Burst pigment powders. So I started layering and then taking away some color. I focused mostly on the colors and those anemone or flower like looking things. 

ptibh616b

The anemone/flower like things were made by using big droplets of water that I let dry and then I stamped the flower inside and drew in the lines. Super fun to do as this was a look that would never have come out of my brain without the inspiration photo!

ptibh616a
Products:

Stamps: Make It Market - Color Pop Florals
Bloomin' Cute

Dies: Bloomin' Cute Sentiments

Thanks for stopping by today and taking a look see!

Tonya

Friday, June 24, 2016

Color Throwdown

Wow, it's been a while...a little dusty here! I've had some spare time lately and thought I would use that time to join in on some fun challenges is the card making world.

First up is a card that I made for the latest Color Throwdown challenge, challenge #398. Here is the latest color scheme and inspiration photo.

I had some "leftovers" sitting on my desk from a previous card that I had made, so I put those to use and just added a little bit of that lime green. Here is the card I came up with...

IMG_2184

I used the One Big Happy stamp and die set from Papertrey Ink for this. The background panel was made by using all of the images in the stamp set and some yellow ink. The frame was one of the pieces from the Pretty Frame Die, also from PTI. The rest of the flowers and the sentiment were all just die cut and stamped and then layered together. Lastly, I embellished with some sequins and a little green gem in the middle of the heart.

Thought I would also share with you the card that I first made (the one that the leftovers came from).

IMG_2183

Thanks for stopping by and taking a peek. Hope you all have a great weekend!

Tonya


Sunday, May 1, 2016

Sparkle & Shine Challenge #29

It's May 1st which means that it is time for the new challenge over on the Sparkle & Shine challenge blog. Today's inspiration is all about spring time flowers.

                  s&smay1

I started this by using three different floral stamp sets from Altenew and stamped, masked, and heat embossed to create the flower arrangement. Then I watercolored in the images with my Peerless watercolors.

                    s&smay1b

The sentiment is from a Papertrey Ink set and I heat embossed that with gold and finished the rest of the card off with some Pretty Pink Posh sequins.

Here is the inspiration photo for this challenge...


Click HERE to come and join us over at Sparkle & Shine. One lucky winner will receive a gift certificate to the Create A Smile stamp shop!


Products:
Stamps: Golden Garden, Wild Hibiscus, Beautiful Day (Altenew) 
Keep It Simple Mother (Papertrey Ink) 


Friday, April 15, 2016

Sparkle & Shine Challenge #28

Hey all, it's time for another challenge over on the Sparkle & Shine challenge blog. Here is our inspirational photo for this time around...


For my card I pulled out my Color Burst pigment powders. I started with a blank panel of watercolor paper and sprinkled pigment powders onto the surface of the dry paper. Then I saturated the paper with water using a Mini Mister. 

IMG_1969

After that dried then I used the Altenew Oriental Orchid stamp set to stamp the images. Then I pulled out some bleach and painted in the images with the bleach to turn it all white. It was pretty amazing seeing the magic happen. Those flowers and leaves were all just as dark purple as the rest of the paper. I would recommend using a better quality watercolor paper for this though. I used a really cheap one and you can see where the bleach bled beyond the borders of the flowers in some spots. With a good quality paper the water will stay only where you put it.

We hope you come and join us in the challenge. One lucky random participant will win a $15 gift certificate to the Right at Home online store. Click HERE to be taken to the Sparkle & Shine blog.


Friday, April 1, 2016

Sparkle & Shine challenge #27

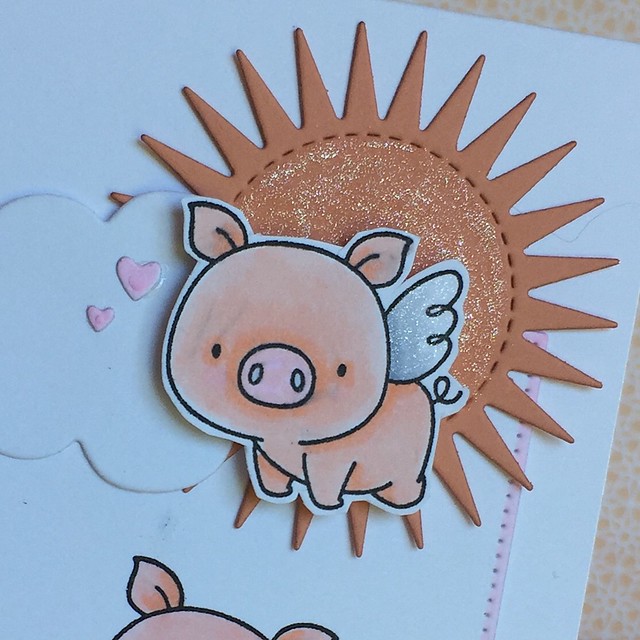
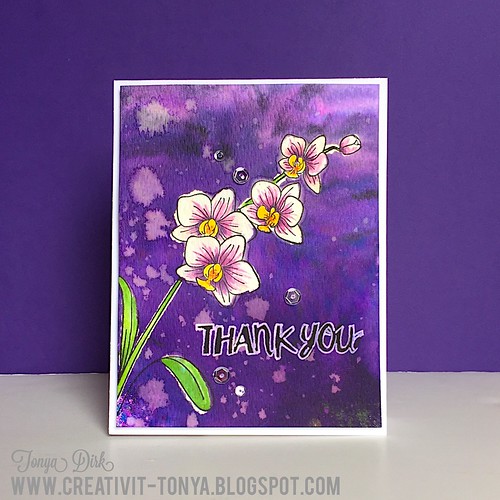
Today is April the first and no fooling' that means that it is time for another challenge over on the Sparkle & Shine challenge blog. The inspiration photo for this time around fits right in with the "April showers brings May flowers" saying...


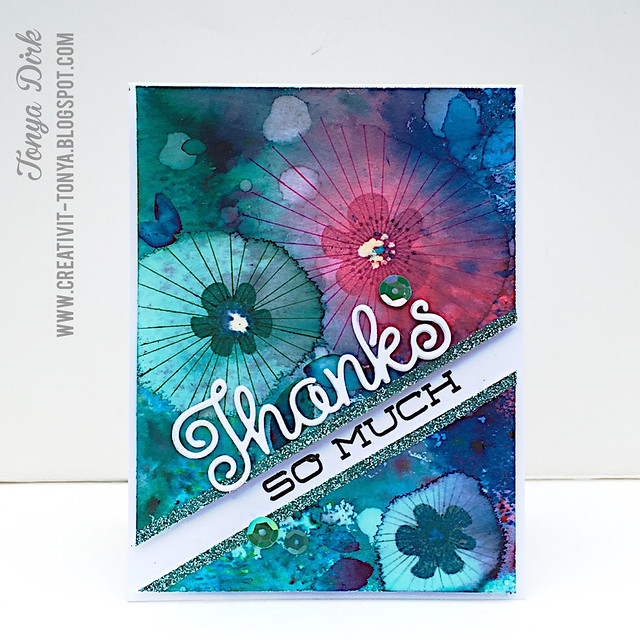
However, we have been having the most gorgeous sunny and warm days here in Portland that I  couldn't bring myself to make a card that had anything to do with rain. I just know that it would jinx us and the rain and grey clouds would come back. So, I went with the happy bright colors...

s&sapril1a

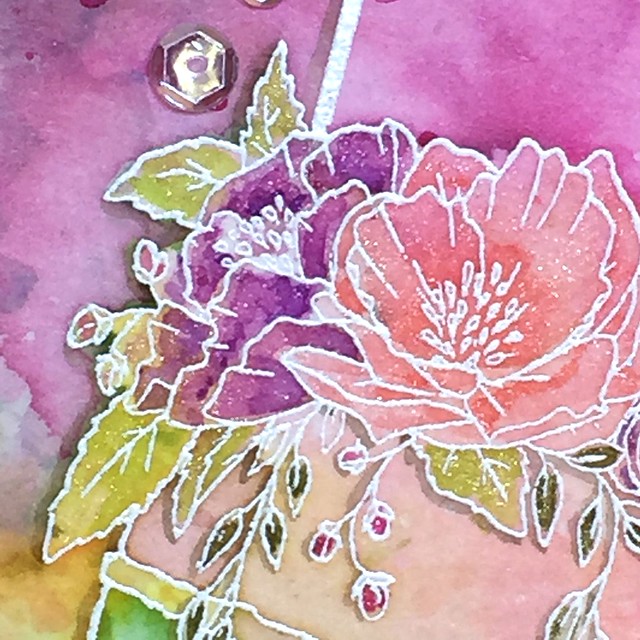
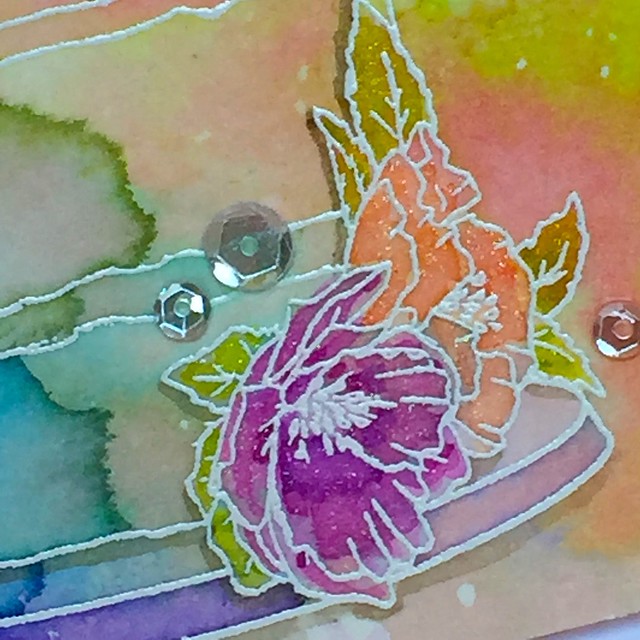
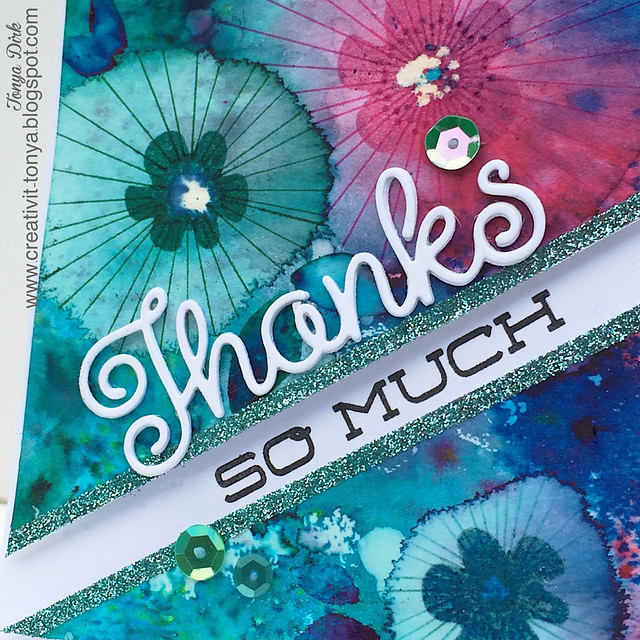
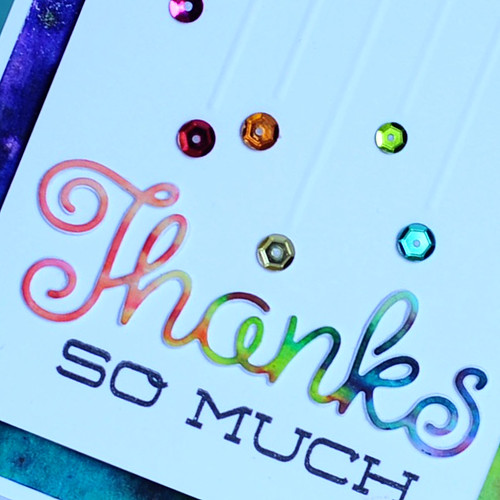
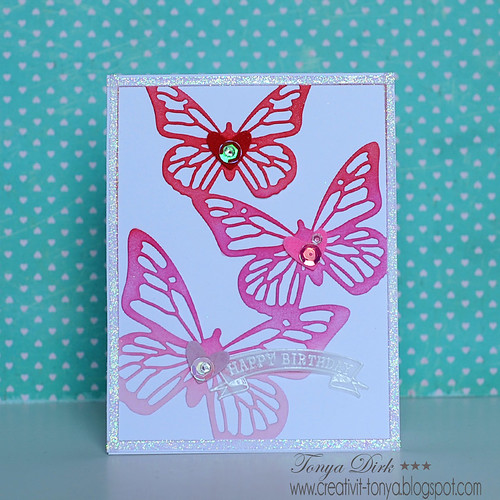
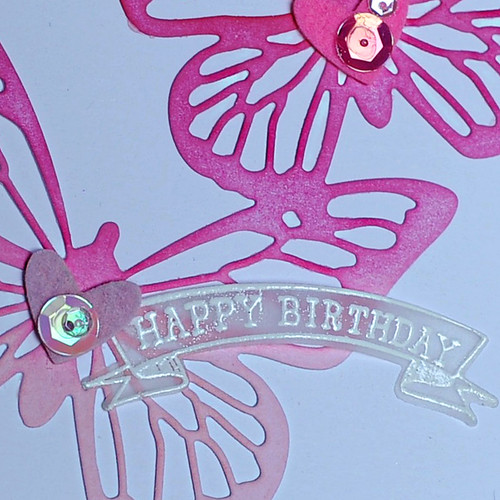
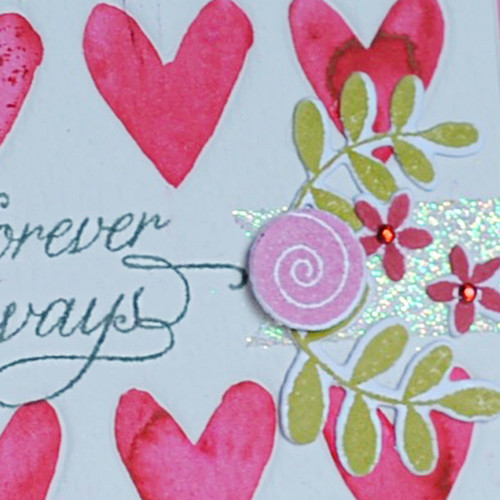
I recently received the 6 new Caribbean colors in the Color Burst pigments and I used all six for this card. On the background panel I simply sprinkled some powder on a dry piece of watercolor paper and then sprayed it with some water from a spray bottle. Set it aside to dry completely and easy peasy...done!

  s&sapril1b

I die cut the thanks out of a piece of watercolor paper that had been painted the same way as my background panel. I also cut two out of white cardstock and layered the three together to give it some added dimension.  Once I had that done I went to add the sequins and decided to join in on the Make It Monday this week at Papertrey Ink, so I dry embossed some lines leading down to each sequin. 
I know, I said I was avoiding the whole concept of rain, but then when I was done I thought those lines and sequins together looked an awful lot like rain drizzles and drops. 

We'd love for you to join us in the challenge over at Sparkle & Shine. Just click HERE to be taken to the challenge. Once you add your project to the link up then you will be eligible to win a $25 gift certificate to the Create a Smile store. 

Thanks for stopping by today.

Products:
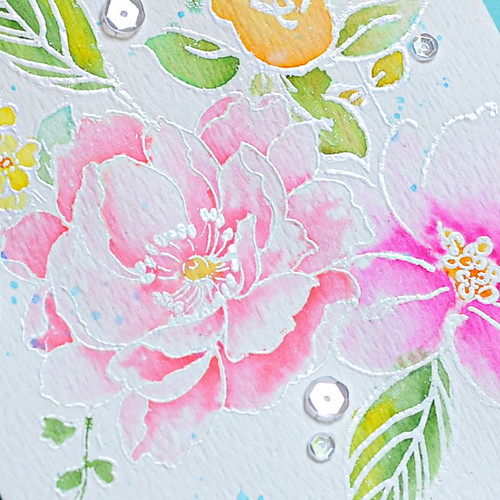
Stamps and Dies: Bloomin' Cute (Papertrey Ink)
Pigment Powders: Ken Oliver- Color Burst (Fuchsia, Tangerine, Chartreuse, Lime Green, Turquoise, Orchid)

Tuesday, March 15, 2016

Sparkle & Shine Challenge #26

Middle of the month means it's time for a new challenge on the Sparkle & Shine challenge blog. Since we are getting close to Easter the inspiration photo features a bunny and of course some orange and green.


For my card I opted to just use the color scheme since I don't have any cute little bunny stamps.

        s&smarch12a

I'll be honest, this card didn't come together very easily for me, it was a comedy of errors. I started with a sheet of watercolor paper and heat embossed the 'happy' and 'to you'. This is a cheaper and thinner paper then what I normally use and when I painted in the letters the water and color spread past the heat embossing instead of being contained within it with other papers I have used. So, I had to find a way to try and cover that...thus the grey shadows. Then I wasn't happy with the plain white background. Enter the blending of the orange ink, which is suppose to have water splatters. However, when the splatters dried they were not even visible and since I used Distress inks, I'm blaming the paper again. Lastly, I had to blindly adhere my shaker panel to the front of the card and ended up leaving way too much white space at the top and this sucker was stuck down nice and tight to the card. So I pulled out some glitter tape and stuck a strip at the top. Oh well, crafting isn't always perfect!

       s&smarch15b

I die cut the 'birthday' three times and adhered them together for some extra dimension and went over the top with a Wink of Stella pen.

Our sponsor for this challenge is Right at Home. Come and join in and you could be the lucky winner of a $15 gift card to their store. Just click HERE to be taken to the challenge.


Products:
Stamps and dies are both from Create a Smile 
stamps: Crystal Letters Upper
dies: Cool Cuts Birthday


Tuesday, March 1, 2016

Sparkle & Shine Challenge #25


Happy March everyone! It's the first of the month which means that it is time for another challenge over on the Sparkle & Shine challenge blog. This month we are inspired by green shamrocks and gold glitter. Here is our challenge photo...

Here is the card that I came up with. I didn't think that I would probably give a St. Patrick's themed card to anyone, so I chose to go with the colors as my inspiration.

s&smarch1a

I started with the Oriental Orchid stamp set from Altenew and watercolored in the images. After that was dry I added some shimmer to the orchids with a Wink of Stella pen. Lastly I ran the panel through an embossing folder to achieve that basket weave look.


   s&smarch1b

Then to pull in the gold glitter I added a strip of glitter tape and heat embossed the sentiment in gold on a strip of watercolored paper.

We'd love to have you come and join us in the challenge. One lucky random winner will win a $25 gift certificate to the Create A Smile store.

Click HERE to be taken to the Sparkle & Shine challenge.

Thanks for stopping by.

Tonya


Monday, February 15, 2016

Sparkle & Shine Challenge Time

Happy Monday everyone. It's time for a new challenge over on the Sparkle & Shine blog. Are you a fan of chevrons? If so, then the photo prompt will be right up your alley!

Here's the card that I made...

s&sfeb15a

I started by die cutting the grey panel and then traced all of the little chevron and diagonal openings onto a piece of white cardstock to give me a guide for all of the stamping.

s&sfeb15b

Then I die cut and stamped the frame. The sentiment was cut three times and then the three pieces were adhered together for some added dimension. Topped it all off with a trio of sequin stars.

Here is the photo inspiration for this challenge...


We'd love for you to come and play along with us...just click HERE to be taken to the Sparkle & Shine blog. The sponsor for this challenge is Right at Home and one random participant will be the lucky winner of a gift certificate to their online store.


Products:

Stamps: Diagonal Additions, Fillable Frames #12 (Papertrey Ink)
Dies: Wonderful Words, Diagonal Additions, Fillable Frames #12 (Papertrey Ink)

Thanks for stopping by!

Tonya


Sunday, February 7, 2016

Papertrey Ink: a Make it Monday installment

Hey everyone! Happy Sunday! It is a beautiful one here today the sun is shining and it's warmish.

The boys are watching the Superbowl and I am crafting some cards. Thought I would take the opportunity to join in on the latest Make it Monday challenge over on the Papertrey Ink blog.

This time around it is all about the ombre. I started with the Butterfly Cover Plate and cut it out of white cardstock, then went to town with some Distress Ink blending (Holly Berries, Fresh Picked Raspberry, and Spun Sugar to be precise). I didn't want the background piece to go to waste, so I placed a second piece of white cardstock behind the butterflies and used them like a stencil. Here's the first card that utilizes the positive space of the die cut.

                 ptimimombre1


                     ptimimombre2

Here is the second card that uses the negative space...

                    ptimimombre3

                    ptimimombre4

Both cards were then embellished with some glitter, felt die cut hearts, sequins and jewels.

Thanks for stopping by and taking a peek!

Monday, February 1, 2016

Sparkle & Shine Challenge #23

Happy February! It's the first which means that it is time for another challenge over on the Sparkle & Shine challenge blog. With February comes hearts, red, pink, and love. That was the focus of this challenge.
s&sFeb116a

I started this one by dry embossing the hearts onto a sheet of watercolor paper which left me with some impressions to use as a guide for painting in the hearts. I sprinkled the paper with some Brusho watercolor pigment powders and then used a water brush to paint in the hearts.
                         
s&sfeb116b

I used some double sided tape to make some glittery banner strips for each side of the sentiment. Then I die cut and stamped some flowers and leaves to embellish with, making sure to add some little jewels inside of the little red flowers.

We'd love for you to come and play along with us over on Sparkle & Shine blog...just click HERE to be taken there and you can upload your project. The random winner will receive a $25 gift certificate to the fabulous Create a Smile online stamp store.


This was the inspiration photo...