Monday, December 31, 2012

Seasons Givings Blog Hop

Welcome to the Seasons Givings Blog Hop!  This hop is going to be a little bit different, in the fact that every single person on the list below, is giving something away.  All you need to do, is go to their blog, and leave a comment.  Really, really easy.  Now grab a cup of coffee, or tea, or maybe some hot chocolate, whatever your favorite is, and start hopping.  


Before we get to the list of participating blogs, I have a few cards to share with you, all made using the December Studio Calico kit.


Here's you list, I marked my name down below so that if you have been going in order you can easily find where you are...


Tonya Dirk   <-------you are="are" font="font" here="here">
Kim Hughes/Paper Smooches

Here are some photos of what I will be giving away...


Make sure to leave a comment below (as well as your email so that I can contact the winner) if you'd like to be entered into my give away. I will also be adding as much 12x12 papers to this box as I can, but since I don't have a box on hand I didn't want to provide photos of papers and then not be able to get them all in. I promise I will stuff the box...

I will accept comments through Friday January 4th.

Thanks and Happy New Year to you all!

Tonya

Wednesday, December 19, 2012

Christmas is coming...

Hi all! Long time no see! :) Just been crazy busy trying to get ready for the holidays, hosting family parties, and taking care of kiddos that have been out of school since last week.

Today I have a fun little wreath to share with you. It was made using the Handmade Holiday line from Simple Stories. I saw the idea for this on Pinterest and it comes from THIS blog post.


Super simple to assemble. I've had a little affliction with glittering up text paper this winter, it's perfect for snowflakes and snowmen!


Wednesday, November 28, 2012

Simple Stories and Epiphany Crafts

     This week Simple Stories is teaming up with Epiphany Crafts for a week long blog hop. I was sent the Shape Studio Tool Scalloped Circle 25 to use, pair it up with Simple Stories Handmade Holiday and there is lots of fun to be had.

     My first project features something a little frosty...a cute little snowman treat bag. See his eyes? They were made using the Epiphany tool, those epoxy scalloped circles were perfect for this!


For my second project I turned those epoxy scalloped circles into a trio of hanging ornaments. 


For the ornaments I used some of the little stickers from Handmade Holiday to embellish the centers before I adhered the epoxy scalloped circles. Love these tools from Epiphany, so easy to just insert your paper, insert the epoxy shape and punch them out together!


Products:

Snowman:  

Kraft Muslin/Dictionary #2720
Green Holly/Notebook #2718
Red Dot/Santa's List #2717
Calendar/Kraft Grid #2716
December 25 #2706

Card: 

Handcrafted #2707
Red Dot/Santa's List #2717
Green Holly/Notebook #2718
Winter Wonderland #2704
Handmade Holiday Flash Cards #2709
Kraft Muslin/Dictionary #2720
Bingo Cards/Dots #2721
Handmade Holiday 12x12 Fundamental Stickers #2702
Handmade Holiday Countdown 12x12 Cardstock Stickers #2725


Thursday, November 15, 2012

Simple Stories December Daily Blog Hop


Hi everyone! Welcome. So glad that you are joining us today for the Simple Stories December Daily blog hop. This is my first year doing a December Daily and using Simple Stories' Handmade Holiday is going to make it SO easy...and lovely too!

For my base I used a Brown 6x8 Sn@p! binder. Here is my cover...


I cut a large snowflake using my Cameo and used it as a mask in conjunction with Mr. Huey's White and a tad bit of Mr. Huey's Gold.


I can't wait until the first of December to start taking photos so that I can fill up all of the divided page pockets. I have finished up quite a few of my page dividers...


More action from my Cameo here to make the ornaments...


This next page is my favorite part so far, well, okay it's a close second to my cover. I used some Papertrey Ink Damask Snowflake Dies on the Dictionary paper, then inked the edges of the snowflakes up and then glittered the heck out of them...LOVE how they turned out!


and a close up...


It is going to be so much fun filling this album up the rest of the way through the month of December and what a cherished memory this will be! 

Make sure you stop by the rest of the Simple Stories' design team blogs to see their awesome albums too!

Simple Stories - Blog: www.simplestories.com
               Cari Locken - Blog: www.myandmythoughts.blogspot.com
           Donna Januzzi - Blog: www.donnajanuzzi.blogspot.com
Emily Lanham - Blog: www.createserendipity.net
   Gail Lindner - Blog: www.gaillindner.typepad.com
                  Guiseppa Gubler - Blog: www.guiseppagubler.blogspot.com
Jill Cornell - Blog: www.jillcornell.blogspot.com
             Kelli Rabideau - Blog: www.kelliesdesigns.blogspot.com
                 Rebecca Keppel - Blog: http://www.myclutteredcorner.com
                    Shellye McDaniel - Blog: www.paperedcottage.blogspot.com
                                     Tonya Dirk - Blog: www.creativit-tonya.blogspot.com  <---you are="are" here="here" p="p">
              Yuki Shimida - Blog: http://lovetodaybyluvbear.typepad.jp

All papers, binders, and stickers are from the Handmade Holiday line by Simple Stories!!!


Monday, November 5, 2012

She's just like me...

Happy Tuesday (or almost Tuesday for some of you). I have a layout to share with you today using Clear Scraps. This one uses a 12x12" clear acrylic sheet as it's background and then the Clear Scraps clear alphabet for part of the title work.


The cutouts on the papers were done in a number of different ways. The Teal paper cam precut, I just took out the center of it. The lavender paper was done using a Martha Stewart punch. The lavender glitter page was cut using my Cameo, an the yellow paper was cut using a Papertrey Ink Doily die.


The above letter were super simple to decorate. I just used a glue pen around the edges and the sprinkled with some yellow glitter/flocking.


The title of this page says it all. I always wanted to be out playing sports with the boys, but never wanted to look like a boy doing so. She's just like her momma. Girls can run fast even in skirts and with bows in their hair!!!!

Sunday, October 28, 2012

So very Sn@ppy...

it makes me so happy! I've said it a billion times already and I'll just keep saying it....I love Simple Stories...my current obsession is their new Sn@p! line. I was so excited when my extremely heavy box of new stuff came, pure heaven! It's been so fun to work with.

I have two projects to share with you that went up on the Simple Stories blog last week. One layout and one card...


Aren't the bright and happy colors just the best?! My children's names and the top part of the title were cut using my Cameo. I've had this layout in my head for a long time and this was the perfect line to finally put it to use!


This line makes great cards too! Right now I am working on an album, sort of like a project life album. Make sure to check out the Simple Stories blog all through this week as we are sharing Sn@p! albums through out the week. Should be lots of inspiration for everyone!


Tuesday, October 16, 2012

Two of my favorite...

companies mixed together. My Mind's Eye and Papertrey Ink have both been long time favorite manufacturers of mine and I love nothing more than having some free time on my calendar to mix the two together for some projects!

All of the following projects feature one or both...these first two are a bit bright, but I love how they turned out!


This next card uses a three step stamp for the roses, you can tell how they have a little more dimension to them than the two samples above where I only used two steps.


Thanks for stopping by today!

Tonya


Monday, October 8, 2012

Winner, winner....chicken dinner!!!!

After putting all of the names of those of you that left me such nice comments last week (those with more than one comment had their name put in an additional time for each comment) into a bucket and then asking my daughter to blindly pick one out.....the lucky winner was of her choice of two Unity Stamp Co. Itty Bitty stamps is....

Miriam Prantner (I emailed you!)

Thank you again for all of the comments, I truly appreciated every one!

Tonya

Thursday, October 4, 2012

Growing in Unity Day Five...

Welcome back everybody! Today is my last day for Growing in Unity, I have really enjoyed my time. Thank you all for the nice and supportive comments that you have left through out the week!

OK, let's get started...

For my final project I made a bright and happy card. Once again I utilized the Spellbinders dies that coordinate with the Blossom Stackers stamps by Samantha Walker.


Added a little Copic action on the stamped images. The little wood veneer heart is from Studio Calico and was also colored with Copics. Papers are from Simple Stories.

Don't forget to leave a comment for a chance to win you choice of Itty Bitty stamps, I'll randomly draw and announce the winner this weekend!

Tonya Dirk

Wednesday, October 3, 2012

Growing In Unity Day Four....

Welcome back for day four of five of my Growing In Unity blog week. Today I have a little bit of a different  project for you. I decided to make a cute little gift with some quick packaging. Once again I put to use the Samantha Walker Blossom Stackers stamp set by Unity Stamp Co..

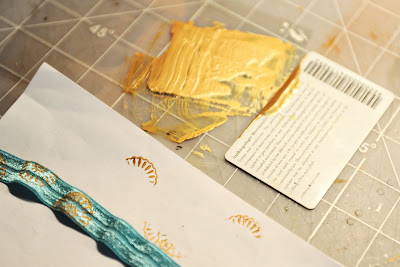
First, I purchased some "fancy" elastic at our local fabric store. Then I pulled out some of my acrylic paints....


To make the headband I started by putting a medium sized dab of acrylic paint on a piece of acetate. Then with an old used gift card I spread the paint out thin and evenly. This is going to be my stamp "pad". Load your stamp wit the paint and stamp away onto the elastic. You'll want to smooth out your paint on your acetate every couple of times that you stamp the image.


Once I was done with the gold paint, then I cleaned off my acetate with a baby wipe and put a little dollop of fuchsia paint on the acetate. Using my stylus I added little dots of pink paint.


Next I made a quick pillow box to match!


...and of course this post wouldn't be complete without my little one modeling the finished product!


Make sure to leave a comment to be entered into the random drawing for an Itty Bitty stamp of your choice!

See you all tomorrow!

Tonya Dirk


Tuesday, October 2, 2012

Growing in Unity...Day Three

I'm back again today with another post using my favorite Unity Stamp Co. stamp set...Blossom Stackers by Samantha Walker.

For this card I opted to go a little wild. Bright colors and a couple of techniques. I started by heat embossing the large scallop flower with white ink and white embossing powder on white card stock. Then I got busy with some Distress ink to make the blended colorful background.


For the flower centerpiece above I mad an accordion flower for the base. To make the second layer I rolled out some clay and stamped it with one of the smaller stamps from the set. Baked it in the oven to harden it then topped it off with an orange jewel. Lastly, I embellished it with some buttons, twine and hand-dyed seam binding.

Don't forget to leave a comment to be entered into the random drawing to win an Itty Bitty stamp of your choice!!!

Hope to see you again tomorrow!

Tonya