Wednesday, December 24, 2014

A very merry christmas

I just wanted to take a quick moment to wish all of my readers the MERRIEST Christmas! Thanks to you all for taking a little time out of your days to check out my work. 

I have two Christmas assignments from My Mind's Eye that I thought I would share with you this Christmas Eve. One has to do with holiday gift giving and the other is a trio of cards. 

Using the Joyous collection, I was able to take this very plain white box and turn it into something that I am proud to place under my tree.


I simply cut two strips of patterned paper and wrapped then around the box. Then I used the striped decorative tape, which I topped with some thin strips of glitter.
The pinwheel bow is one of the smaller ones in the package. I embellished the rest of the package with stickers from the sticker sheet and the tiny alpha package.


I also created a set of four gift card tags. These were all cut from the 6x6 Decorative Paper pads.


This box was decorated using the Sleigh Bells Ring Collection.


 The great part about these is that these are “easy to make” shaker cards. Yep, that’s right with the help of the My Mind’s Eye chipboard frames, available in the Sleigh Bells Ring collection, some of the work has already been done for you! 


This next picture shows how these were assembled.


I simply adhered a piece of transparency on the backside of the frames, then added a layer of foam tape around the edges of the window, poured in some glitter and sequins. Lastly, I covered it all with the patterned paper that I wanted to show through the front side of the window.


Then I just adhered them all to card fronts and embellished away!


I added some glitter to the cardinal to help him stand out against the background paper better.


For this next card I used the banner pieces that are in the mixed bag. I turned them upside down to make trees out of them and then topped each one with an enamel star.


These really were so simple to make. The chipboard frames give you the perfect base to begin making your own interactive cards.
 
Hope you all have a very Merry Christmas!!!


Tonya


Thursday, December 11, 2014

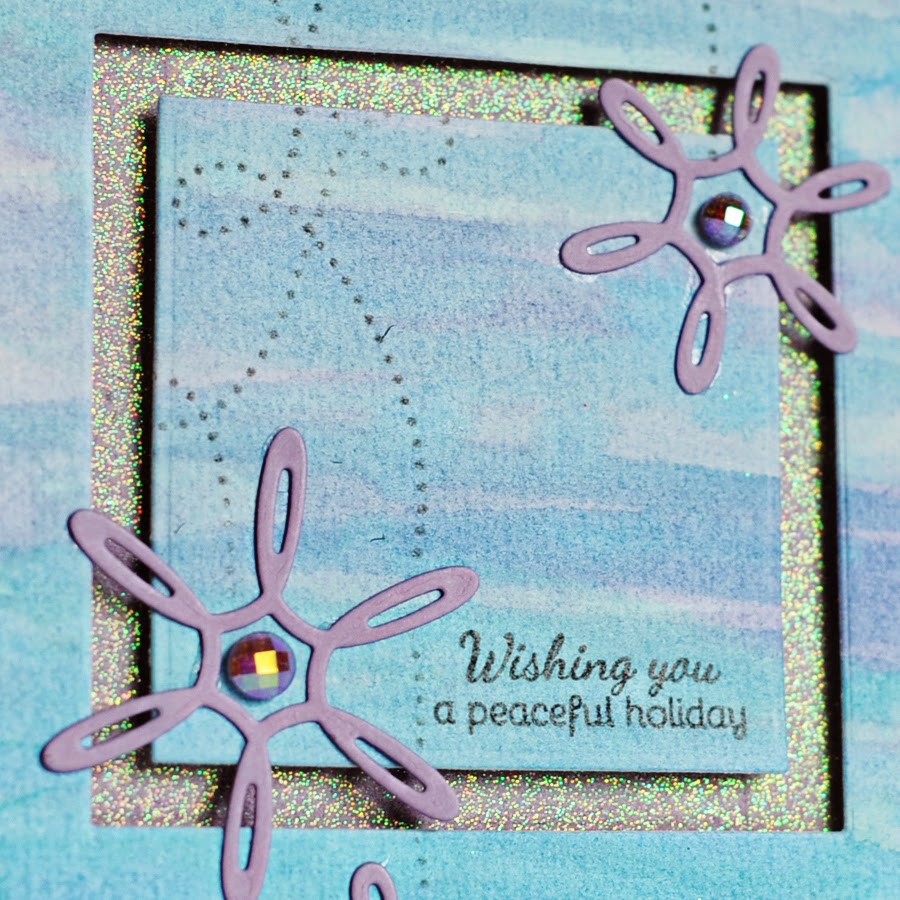
Peaceful holidays

Hey! Popping in for a quick card share. This one features some cool looking retro snowflakes, which will also make some great flowers come spring time!

I used CAS(E) sketch #102 for this one...


I started off by painting a piece of watercolor paper. The frame opening was backed with some iridescent glitter.


Here is the sketch that was the starting point for this one! 


Thanks for stopping in and taking a peek.

Products:

Stamps and Dies: Freshly Fallen from Papertrey Ink

Tonya 

Wednesday, December 10, 2014

Trio of tags

Happy Tuesday everyone! Today I have a trio of Christmas tags to share with you. These were made for the latest Simon Says Stamp blog challenge...bling it on. I used some very subtle bling on my tags, little red sequins. Turns out they make great substitutes for noses, earmuffs and pom poms on top of hats!


All three images were stamped onto white cardstock using Versafine ink and then colored in with Copic markers. 


Added a little glitter to the snowman using Stickles.


You can't see it in these photos but all of the stars and the white on the penguin are sparkly to thanks to a Wink of Stella pen.


Stamps:

Papertrey Ink- Pom Pom Pals

Dies: 

Papertrey Ink: Tag Sale #4, #8
Canned, Monthly Moments Journal Card #1, Journal Card Borders

Thanks for popping in!

Tonya


Wednesday, December 3, 2014

Sleigh Bells Ring wreath

     Yay! The holidays are here and that makes me so happy. You know what else makes me happy? The new Sleigh Bells Ring collection! So much fun! When I saw it I immediately knew that I wanted to make a new wreath with it. You know, some new swag for our front door.


Supplies: Sleigh Bells Ring- “Reindeer” Paper, “Christmas Tartan” Paper, “Christmas Confetti” Paper, “Red Reindeers” Paper, Mixed Bag, Bows, Decorative Brads, Flair, 6x6 Decorative Paper Pad


This was super easy to make. I started with 14 6x6” squares of paper. I used one of the Martha Stewart decorative edge punches and punched the corner and two sides of each square.
Then I rolled them all up and then glued them around an 8” circle of chipboard. From there I just embellished.


For the hanger I attached a large grosgrain ribbon and used one of the big paper bows from the collection. Love those things, can’t wait to use them on some packages!


Happy Holidays to you all. Would love to see what you create with Sleigh Bells Ring.

Tonya

Monday, December 1, 2014

A bright happy thank you

Happy December everyone! This week I was in the mood to pull out the Copics and do some coloring. Pretty much stuck with the bright rainbow scheme that I have been feeling lately.


This card was inspired by the latest CAS(E) this sketch...


As you can see above I heat embossed the stamped image in gold, colored it in with Copics and then topped bits of it off with a Wink of Stella glitter pen.

Stamps:
Papertrey Ink- Fancy That, Basket of Blessings

TONYA

Friday, November 28, 2014

Runway Inspired Challenge

Happy Friday everyone! Hope you all had a great Thanksgiving! Ours was pretty mellow...a kiddo with a blown out knee, another that came down with a fever with some other crud, and a hubby who had to work.

Today I have a card to share with you that was inspired by the latest challenge over at Runway Ispired Challenges...


This was the inspiration photo from Hervè Lèger by Max Azria for spring 2015.


If you pull up the above photo larger you will see that the lines on the dress are all little gold studs. To incorporate that look I used little hexagon gold sequins lined up behind the negative 'you' letters.
Yeah, a little time consuming, but I really like how it looks.


The flower motif was heat embossed with gold on watercolor paper and then painted in with Distress Inks. I also used the same Distress Inks for the letters in the word 'thanks'.


Thanks for taking a peek!

Tonya

Tuesday, November 25, 2014

Let it snow

It's time for another Papertrey Ink blog hop. This month the focus was on glitter and snowflakes. Two things that are right up my ally!!!! Love them both. I also seem to be stuck in a rainbow mode. Was going to go with the traditional white, but then I decided to go a different route than what most of you will take.


I started with the stitched snowflake die and then stitched each arm of the snowflake using a different color of the rainbow. 


Behind the snowflake I used ScorTape to add a background of rainbow striped glitter.


Products:

Papertrey Ink-
Dies: Stitched Snowflake
Stamp Set: Two Feet Deep

Thanks for stopping by today!

Tonya


Saturday, November 22, 2014

Hello

Hey all, popping in with a quick post for the latest Make It Monday over at Papertrey Ink. This week the challenge was all about using your dies to emboss an image onto your paper and then coloring in the images.

My cards started with the Cover Plates Heart Die and then the images were painted in with Distress Inks.


The sentiment was cut using the die from Wonderful Words: Hello. I adhered a strip of ScorTape to the top of a piece of True Black cardstock before cutting out the word. Once cut I took off the release paper and sprinkled it with glitter. Popped the word up on the card front with foam tape.

Supplies:

Papertrey Ink:

Dies: Cover Plate Heart, Wonderful Words: Hello

Stamps: Framed Out #11, Wonderful Words: Hello

Other: 

Distress Inks: Picked Raspberry, Spiced Marmalade, Squeezed Lemonade, Mowed Grass, Salty Ocean, Seedless Preserves

Thanks for stopping by!

Tonya


Friday, November 14, 2014

Runway Inspired plus CAS(e) This...

Combining another two challenges...this time it is Runway Inspired (using the late Oscar De La Renta as inspiration) and CAS(E) This Sketch challenge...

These both started with a plain piece of watercolor paper that was stamped repeatedly with the same image using Versamark ink and then heat embossed. Once that was done I blended a bunch of Distress Ink with water and a brush. The lighting is poor right now, so the photos aren't the greatest and I don't think you can see the embossing, but I promise it is there!

Here is the inspiration sketch...


Here are my two cards...


I cut the painted embossed piece of paper along the stamp lines and used the positive piece on the above card and the negative piece below (or vice versa..whichever way you choose to look at it!).


Stamps:

Papertrey Ink- Note Niblets, Wet Paint, Background Basics: Art Deco

Inks:

Ranger Distress: Fresh Picked Raspberry, Mustard Seed, Persimmon, Broken China
Papertrey Ink: Smokey Shadow, Fresh Snow
Versamark

Dies:

Papertrey Ink: Wet Paint, Note Niblets

Thanks for popping by!

Tonya


Thursday, November 13, 2014

Mixed...

This blustery cold weather that we have been having this week has made want to just bundle up inside and craft away! This card is the combo of two different challenges happening this week. The first one is Papertrey Ink's Make it Monday #188 and the second is for Muse #93...


I started by masking off a triangle with tape and then did the ombrè green stripes. Next I blended some Crushed Olive Distress ink around the edges. Next, I die cut the tree and star out. Took off the tape and hand stitched around the edges. 


I backed the tree and star with glitter.


Stamps:

PTI- Ombre Builders, Snow Globe Sentiments

Dies: 

PTI- Hello Sun

Inks: 

PTI: Limeade Ice, Simply Chartreuse, Spring Moss, Ripe Avocado, Pinefeather
Ranger Distress Inks: Crushed Olive

Hmmm...my photos are crisp and clear on my computer, but once they were imported to blogger they are blurry...anyone know why????

Thanks for stopping by!

Tonya


Friday, October 31, 2014

Happy Halloween!

Here's hoping you all have a wonderfully wicked Halloween! Here's a couple of cards to share…all made using the My Mind's Eye Frightful collection.


I adore those pumpkins above card! So cute!

Hope you all have a boo-tiful evening!

Tonya

Tuesday, October 28, 2014

Blog Post brought to you by the letter 'N'

Hi all! It's been a while since I have shared some of my My Mind's Eye projects with you so I thought I'd give you all a peek at what  have been up to.

This project was super easy to make. We're getting ready to do a make over in my daughter's room. While perusing the aisles at one of our local craft stores I came across a 12x12" frame on clearance.
I simply cut the large 'N' out with my Silhouette and then backed the open space with a bunch of different pieces of patterned paper that had been die cut into hexagon shapes.


I stitched around the letter and then embellished with some die cut pieces, chipboard pieces, gold metallic rub ons, and some enamel dots. 


I also wanted to add a little more visual interest to hexagon shapes so I randomly hand stitched two stitches here and there.


Now I just need to find some time in our schedule to get the walls painted and maybe this room make over will actually happen!

All supplies are from the My Mind's Eye Jubilee Collection (I used pieces from all four lines- Mint Julep, Tangerine, Wild Berry, and Sherbet)

Tonya